Virtual Escape Room team building tips
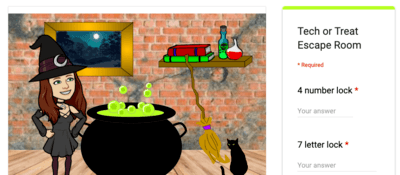
Sample Escape Room Google Form
Answers for the Sample Escape Room:
#1: dozens
#2: your fingers
#3: 229, 13
#4: 24
To make your own Virtual Escape Room using Google Forms all you need to do is set response validation on every question in the form and display only one question at a time, check out the video below!
Please find attached a template for you (or even your students) to use to make a digital escape room!
1. Write your prompt
You need a good story to hook the audience. When you go to a physical escape room, they set up the situation with a story or information at the beginning.
2. Create your clues
Determine how many and what kind (number, word, etc.) of clues you want. You can make the clues lead people to Google Slides, Docs, Jigsaw Planet, etc. or practically any other puzzle maker site. Keep all of these in a folder in my Google Drive so everything is together.
Below is a collection of tools and resources that can be used in the creation of your Breakout game. Take a look and see if some of these sites help spark some creative ideas for clues to use in your Breakout Game.
3. Create your image(s)
Have an interactive image created in Google Drawing. We plan to put all of this in a Google Site at the end, and you can easily import a Google Drawing and keep the “hotspots” active this way.
Once your image is created, you need to link your clues to each object. Let's say you have 5 clues, so you could link it to the window, broom, cat, book, cauldron, and one of the flasks. You can make anything you added to your image clickable as a link! To do that: First, click on the object you want to link (eg. the window), then click on the link button and paste the link to the clue. Continue this process until you link to all of your clues.
4. Create your locks
This step uses Google Forms. Create a new Google Form (preferably keep everything for each escape room in one folder). You want to use response validation (check out this video for a walkthrough on how to add it) so they have to type in the correct clue. You also want to make the question required.
5. Create your Google site
Go to sites.google.com . Google Sites is the perfect landing page for your Digital Breakout. It has flexibility and style while being simple to work with. Sites allow for easy embedding of Google Drive items as well as linking to any other website. Here's a video on how to use Google Sites
Insert the Google Drawing using the insert from Drive button.
You can use the corners and drag your image to be as large as you want. Do the same for the Google Form. You can position them side-by-side, or with the form below the image. Use whatever works for you and the image(s) you have created.
When you are ready, hit the publish button. Don’t forget to go through the Escape Room yourself and make sure everything works as you want. You can click the link button at the top right on the toolbar and get a code that you can share; post that link in Google Classroom.
That’s it! Now you’re ready to get started creating your very own digital escape room.
The premise is relatively simple: players must complete a series of tasks in order to gain passwords, retrieve clues, or gather other information needed to “escape the room”– digitally, physically, or both. The idea is extremely innovative: it works with any content area, particular skill or objective you’re teaching, and students are needless to say, extremely into it. After all, their “lives” are on the line!
Web source - https://ditchthattextbook.


Comments
Post a Comment